Nextcloud is fully compatible with the WebDAV protocol, and can be connected and synchronized with your Nextcloud files through WebDAV. In this chapter we will learn to connect MacOS and Windows to your Nextcloud server through WebDAV. Before we start configuring WebDAV, we will take a quick look at the recommended way to connect client devices to your Nextcloud servers in the manual How to synchronize Nextcloud Desktop and Nextcloud on Smartphones?.
NOTE: In the following examples, we will have to adjust example.com/ to the URL of our Nextcloud server (consult with our provider in case of doubt).
WebDAV configuration:
In order to avoid having to download the Nextcloud Desktop application, we can connect our computer to the Nextcloud server through WebDAV. WebDAV is an extension of hypertext transfer protocol (HTTP) that facilitates the creation, reading and editing of files on web servers. With it we can access our Nextcloud shared resources on Linux, macOS and Windows in the same way as any remote network resource, and stay synchronized.
-
WebDAV configuration in MacOS:
NOTE: The macOS browser suffers from a series of implementation problems and should only be used if the Nextcloud server runs on Apache and mod_php, or Nginx 1.3.8+.
To access the files through the macOS search engine:
1. First click on Go in the Connect to server section.
2. A window will open in which we will specify the address of our Nextcloud server.
”https://example.com/nextcloud/remote.php/dav/files/USERNAME/”
3. Finally click on Connect.


-
WebDAV configuration in Windows:
If you use the native Windows implementation, you can assign Nextcloud to a new unit. The assignment to a unit allows us to browse the files stored on a Nextcloud server in the same way as files stored on a mapped network drive would.
The use of this function requires network connectivity. If we want to store your files without Internet, we will use Nextcloud Desktop to synchronize all the files in your Nextcloud with one or more directories of your local hard drive.
NOTE: Before mapping your disk, you must allow the use of Basic Authentication in the Windows Registry. The procedure is documented in KB841215 and differs between Windows XP / Server 2003 and Windows Vista / 7. Follow the Knowledge Base article before proceeding and follow the instructions in Vista if you are running Windows 7.
Assignment of units with the command line:
The following example shows how to assign a unit using the command line. To map the unit:
-
We will open a command prompt in Windows.
-
We will enter the following line at the command prompt to assign to unit Z of the computer:
net use Z: https://server/remote.php/dav/files/USERNAME/ /user:youruser yourpassword
NOTE: In ”server” we will introduce the URL of our Nextcloud server, in youruser, our user and in yourpassword, our password.
NOTE: Although it is not recommended, you can also mount the Nextcloud server using HTTP, leaving the connection decrypted. If you plan to use HTTP connections on devices while in a public place, we recommend using a VPN tunnel to provide the necessary security.
An alternative command to do the above:
net use Z: \example.com@sslnextcloudremote.phpdav /user:youruser yourpassword
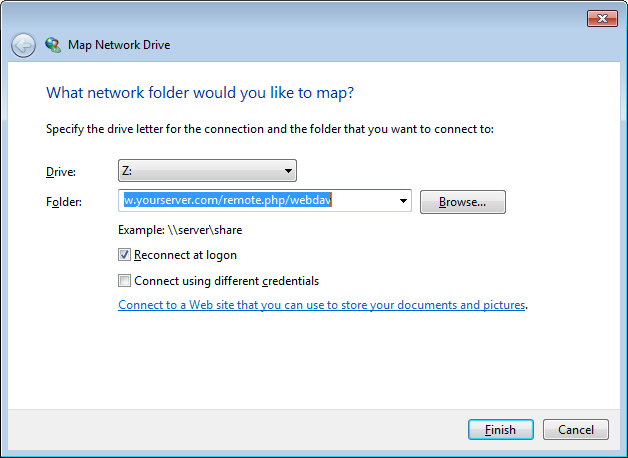
Assignment of units with Windows Explorer:
To assign a unit using Microsoft Windows Explorer:
- We will migrate to our computer in Windows Explorer.
- We will press right button in Computer Input and we will select Assign network unit… from the drop-down menu.
- We will choose a local network unit to which you want to assign Nextcloud.
- We will specify the address of your Nextcloud instance, followed by /remote.php/dav/files/USERNAME/.
- We will press Finish.
For example: https://example.com/nextcloud/remote.php/dav/files/USERNAME/
NOTE: For servers protected with SSL, we will mark Reconnect at logon to ensure that the assignment is permanent at subsequent reboots. If we want to connect to the Nextcloud server as a different user, we will check Connect using different credentials.
Accessing files using Cyberduck:
Cyberduck is an open source FTP and SFTP browser, WebDAV, OpenStack Swift and the Amazon S3 browser designed for file transfers in macOS and Windows.
NOTE: This example is made with the version of Cyberduck 4.2.1
To use Cyberduck:
1. We will specify a server without main protocol information. For example: nextclouddemo.net
2. We will specify the appropriate port. Which one we choose depends on whether our Nextcloud server is SSL compatible. Cyberduck requires that we select a different connection type if we plan to use SSL. For example:
80 (for WebDAV)
443 (for WebDAV (HTTPS / SSL))
3. To finish we’ll use the More options drop-down menu to add the rest of our WebDAV URL in the Route field. For example: remote.php/dav/files/USERNAME/
Known problems:
1. Problem:
Windows does not connect using HTTPS.
- Solution 1:
The Windows WebDAV client may not support the Server Name Indication (SNI) on encrypted connections. If we find an error when mounting an Nextcloud instance encrypted with SSL, we will contact our provider to assign a dedicated IP address for our SSL-based server.
- Solution 2:
The Windows WebDAV Client may not be compatible with TSLv1.1 / TSLv1.2 connections. If we have restricted the configuration of our server to only provide TLSv1.1 and higher, the connection to our server may fail. We will consult the WinHTTP documentation for more information.
We received the following error message: Error 0x800700DF: the file size exceeds the allowed limit and can not be saved.
- Solution:
Windows limits the maximum size that a file transferred to or from a WebDAV share can have. You can increase the FileSizeLimitInBytes value in HKEY_LOCAL_MACHINESYSTEMCurrentControlSetServicesWebClientParameters by clicking Modify.
To increase the limit to the maximum value of 4 GB, select Decimal, enter a value of 4294967295, and restart Windows or restart the WebClient service.
3. Problem:
Access to our files from Microsoft Office through WebDAV fails.
- Solution:
The known problems and their solutions are documented in the article KB2123563.
4. Problem:
You can not assign Nextcloud as a WebDAV drive in Windows using a self-signed certificate.
- Solution:
- We will go to our Nextcloud instance through your favorite web browser.
- Press until you reach the certificate error in the browser’s status line.
- We will see the certificate, and from the Details tab, we will press Copy to file.
- We will save it on the desktop with an arbitrary name, for example myNextcloud.pem.
- We will start it and execute it, MMC.
- Press File, Add / Remove complement.
- Select Certificates, clicking on Add, My user account, then Finish and then OK.
- We will uncover Trust Root Certification Authorities, Certificates.
- We will right click on the certificate, selecting All tasks, Import.
- We will select Save Cert from the Desktop.
- We will select Place all certificates in the following store and click on Browse.
- We will check the Show physical stores, expand the Trusted root certification Authorities and select Local computer and click on OK, completing the import.
- We will verify the list to make sure it is displayed. We will probably need to update before seeing it and we will leave MMC.
- We will open the browser, selecting Tools and deleting the browsing history.
- We will select everything except Private filtering data.
- We will go to Internet Options, Content tab, Clear SSL status.
- Finally we will close the browser and then we will open it again and test if the error has been fixed.
5. Problem:
We can not download more than 50 MB or load large files when the load takes more than 30 minutes using Web Client in Windows 7.
- Solution:
The solutions are documented in the article KB2668751.
Accessing files using cURL:
Because WebDAV is an extension of HTTP, cURL can be used to create scripts for file operations.
To create a folder with the current date as name:
$ curl -u user: pass -X MKCOL “https://example.com/nextcloud/remote.php/dav/files/USERNAME/$(date ‘+% d-% b-% Y’)”
To load an error.log file in that directory:
$ curl -u user: pass -T error.log “https://example.com/nextcloud/remote.php/dav/files/USERNAME/$(date ‘+% d-% b-% Y’) / error .log”
To move a file:
$ curl -u user: pass -X MOVE –header ‘Destination: https://example.com/nextcloud/remote.php/dav/files/USERNAME/target.jpg’ https://example.com/nextcloud/ remote.php / dav / files / USERNAME / source.jpg
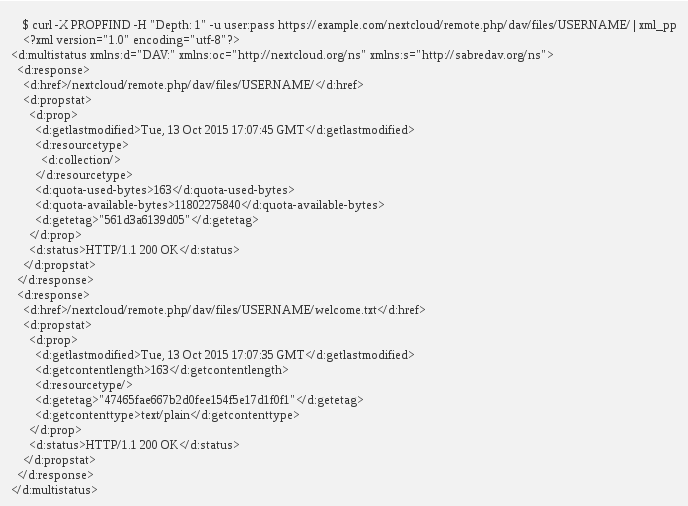
To obtain the properties of the files in the root folder:
Pls, I will appreciate guidiance on how to Implement file upload from an asp.net core application to nextcloud