Advanced modules
For now, you must have a fundamental understanding of the SuiteCRM user interface, the basic modules, the designs, the creation, search and record management.
Advanced open sales
The first ‘Suite’ of advanced modules is AOS (Advanced Open Sales). The various modules that are part of the set of AOS modules allow you to manage post-opportunity sales processes, such as budgets, billing and recurring hiring. This functionality is available to you through the following modules:
– Product Categories
– Products
– PDF templates
– Budgets
– Invoices
– Contracts
Products module
You can create Product records using the ‘Products‘ module. Product creation allows users to select product lines when preparing budgets using AOS. The product module allows users to specify the product name, part number, category and type. Additional fields can be added for Products using Studio.
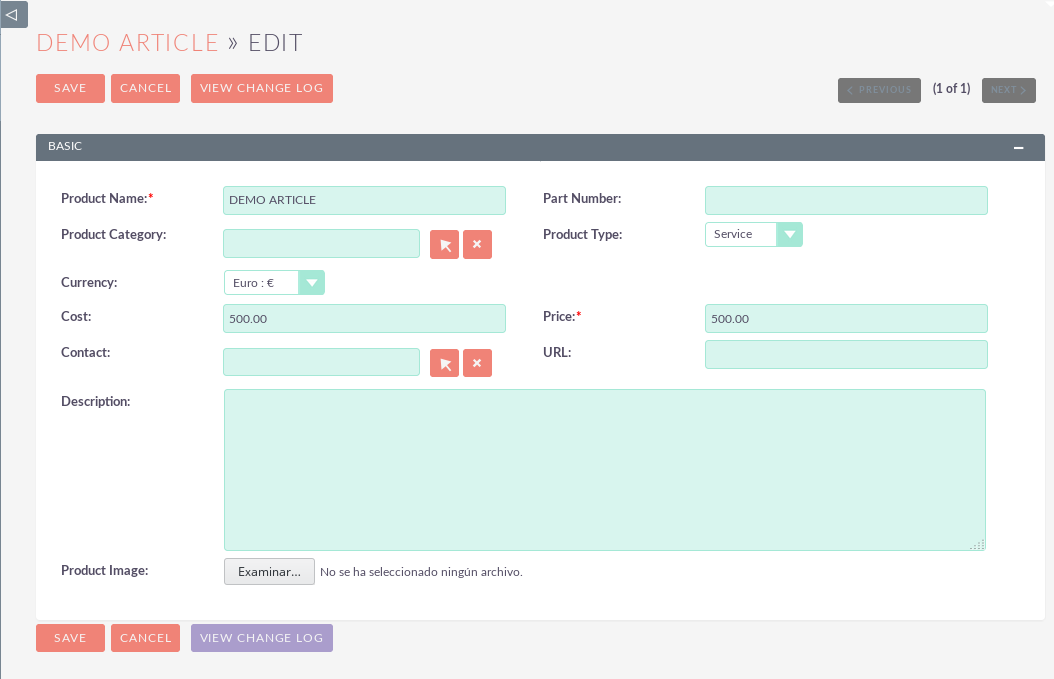
The module also allows users to define a Cost and Price for the product. The price is the sale price that will be used in the quotation process. A related contact can be associated with the product. This is the point of contact with the supplier regarding this product. If you have a Product Image, it can be loaded into the product registry. You can also specify a URL for the product page on your website.
Product categories module
The ‘Product Categories‘ module allows Users to structure Products in a hierarchical category structure. To create a product Category record, go to the Product Categories module and click on the “Create product categories” button in the action bar.
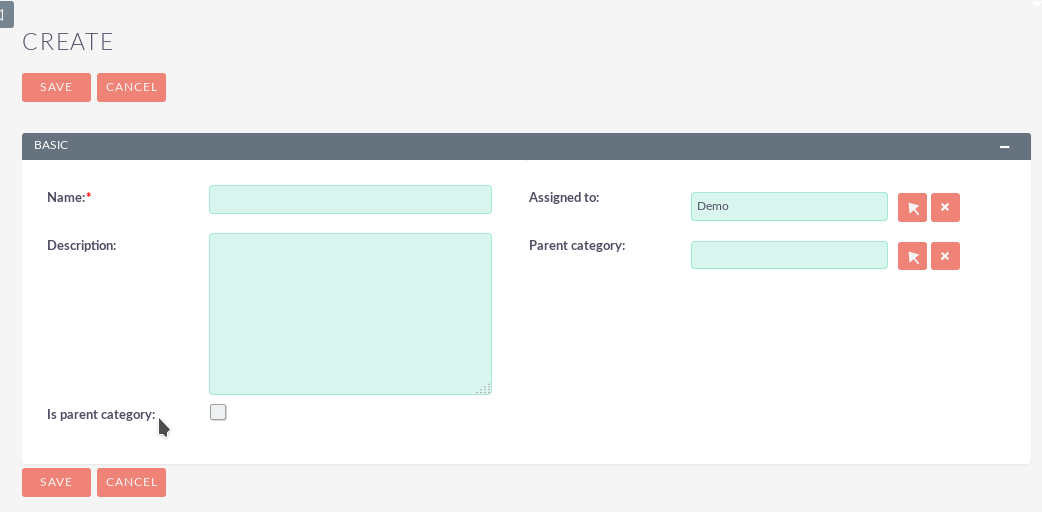
The field ‘Is Parent Category‘ is a field of relationship with another record of Product Categories. If you check the ‘Is Parent category‘ field, this means that the category is the highest level. Once selected, you can not select a ‘Is Parent Category‘ using the related field.
PDF templates
Creating templates
AOS allows users to generate PDF documents and combine data from the SuiteCRM modules. However, you must first create a template in PDF.
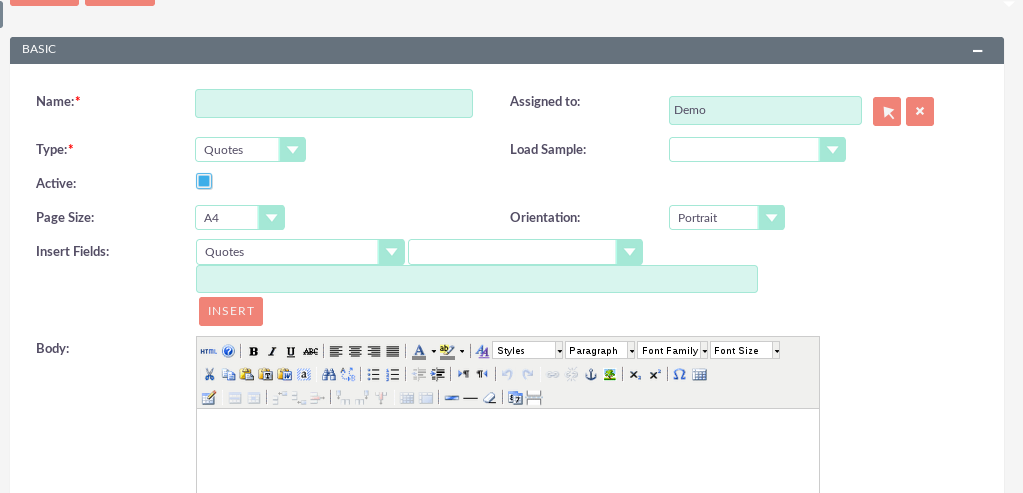
This module provides a WYSIWYG interface to create dynamic PDF templates. You must select a Type. This is the module for which you are building the PDF Template. By default, the modules you can select are: Budgets, Invoices, Accounts, Contacts and Potential Customers.
System Administrator users can expand this list by editing the ‘pdf_template_type_dom‘ using the functionality of the drop-down editor. Note that the ‘Element Name‘ drop-down should be the name of the module directory.
To insert fields in the body of the template, users will first select a module. This will be the same module as the Type or a module related to the Type module. This is selected using the first drop-down menu in the Insert Fields row.
This will complete the second drop-down menu with all the fields that are inside that module. Once you have selected the field you want to insert, the text field will be filled with the name of the field variable. Click on ‘Insert‘ to place this field in the body of the template. If the Active check box is selected, users can generate PDF files from this template. If it is not selected, it will not.
Load Sample
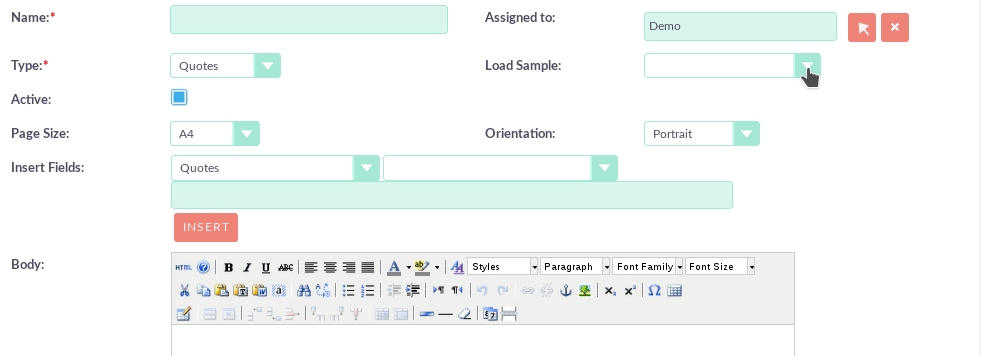
AOS comes with seven predefined PDF templates to help you create your own. These can be loaded by selecting the appropriate template from the Load Sample drop-down list.
Line items
When a sample is used to create a template for Budgets or Invoices, line items are formatted within a table. You can change the fields that are in this table, as well as add or delete columns. Note that if you are going to create the template from scratch.
Margins
At the bottom of the PDF Template Edit View, you can specify the margin width for PDF output.

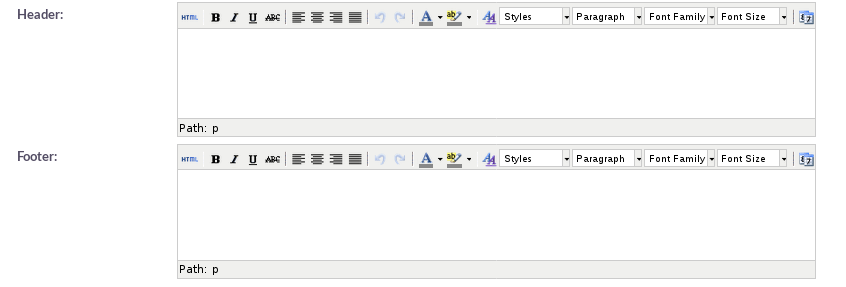
Header and footer
Within the PDF template editing view, you can also define a header and a footer for your templates. These can be completed using the Header and Footer text areas below the Body text area.
Generate Document
You can generate PDF documents for Accounts, Contacts and Clients using the Generate Document functionality.

By clicking on the ‘Generate Document‘ button found in these modules, the Details View will show a pop-up window that will ask you to select a template.
The pop-up window of the template selector will show all active templates that have the same Type as the record module. Clicking on the name of the template will generate a PDF document with the populated date of the record and its related records. The Generate Document functionality can also be activated from the List view. This allows you to select multiple records and click on the ‘Generate Document‘ button in the actions menu of the List View.

The process to generate PDF files for quotes, invoices and contracts is described in their respective sections.
Budget module
Creating a budget
You can create a budget by going to the Budget module and clicking on ‘Create Budget‘ from the action bar. The first panel allows you to specify details about the budget, such as the Title, the related Opportunity, the Stage and the Payment Terms. The Budget number field is calculated automatically.

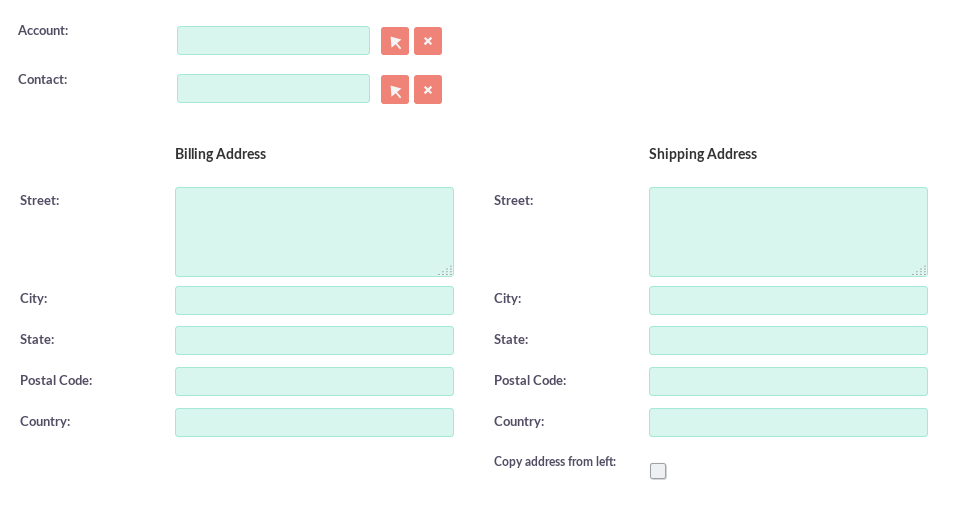
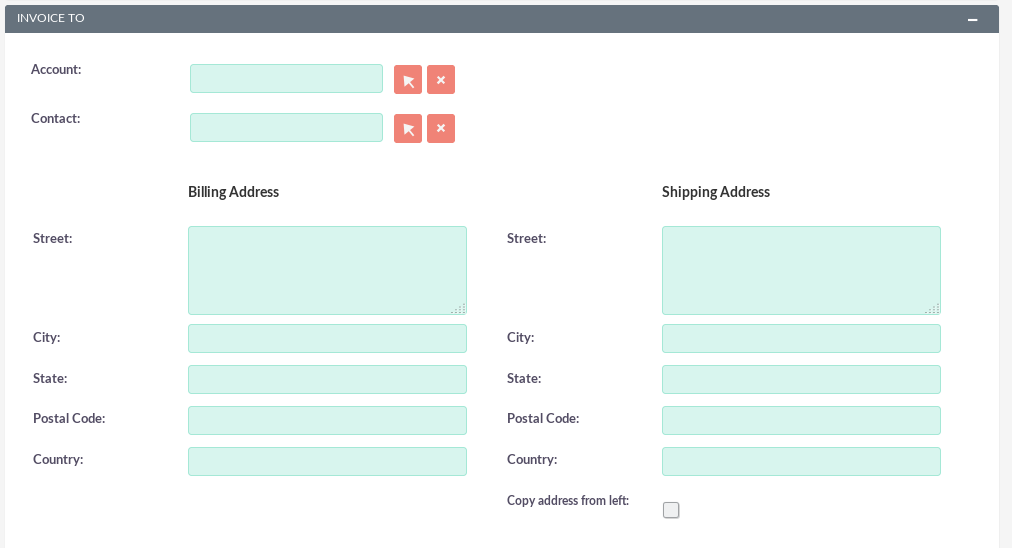
The second panel allows you to specify for whom the Budget is by relating an Account and Contact with the Appointment. When you select the account, the billing address and shipping address are dynamically extracted from the account and completed in the budget record fields.
Line items with groups
The third panel allows users to specify contribution groups, line items and currency. A group is a collection of line items with its own group total. A line item can be a product line or a service line. To add a budget group, click on the ‘Add group‘ button.
NOTE: Add group will be displayed if “Enable line item groups” is selected in Admin.
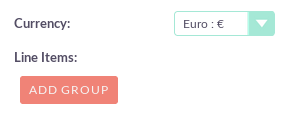
This will show the group, which allows you to insert a group name and add a product line or service line. It will also show the group totals.
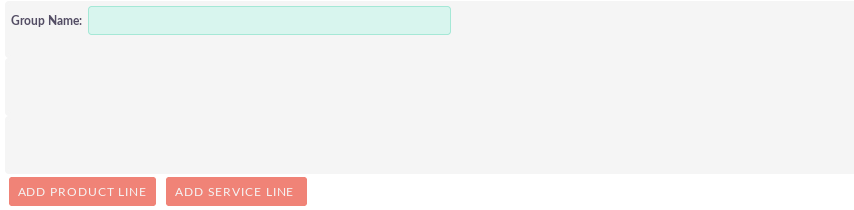
To add a product line, click on the ‘Add product line‘ button. This will allow users to quote products from the Products module.
To select a Product, you can start typing in the Product or Part Number field that will provide a list of results similar to any related field. You can also click on the arrow button next to the Part Number field. This will show a pop-up window that allows you to select from a list of Products.

Once you have selected a product, the list, the sale price and the total will be completed automatically. You can change the Quality, add Discounts (Percentage or Amount) and increase the percentage of the Tax. This will alter the Sales Price, Total Price, and Total Group fields. To add a service line, click on the ‘Add service line‘ button. This will allow users to quote for services.

For service lines, you must specify the price of the list. This will complete the sale price. Taxes and discounts can be added similarly to the product line. AOS will maintain a Grand Total for each Group.
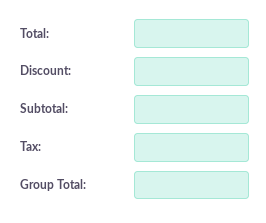
AOS will also maintain a Grand total for all groups combined.
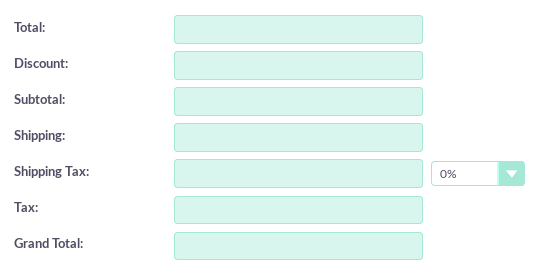
The Shipping field allows you to add a shipping cost. The Shipping Tax field allows you to add taxes to this value. Once a budget has been compiled, click on ‘Save‘ to save the budget.Line items without groups
Creating budgets without groups is very similar to creating budgets with groups. The only difference is that you do not have to click on ‘Add group‘. Simply ‘Add product line‘ and ‘Add service line‘ to the budget. Without groups, you can not see the Total group fields. You will only see the Grand total fields.
Sending Budgets
To generate a budget, you can select one of the following three buttons in the quote details view.

AOS provides users with three methods to send budgets:
– Print as PDF: allows you to select a template and download or save a PDF of the Appointment.
– Email PDF: allows you to select a template and then direct it to the “Compose” screen of the SuiteCRM email client. The budget PDF will be attached to the email and the email will be directed to the contact of the corresponding budget. This allows you to complete the body of the email.
– Email Quotation: this directs you to the email screen of the SuiteCRM email client. The email will be directed to the related contact of the budget. There will be no attachments and the appointment will be displayed within the body of the email.
Convert to Invoice
With AOS you can convert budgets into invoices. This can be achieved by clicking the “Convert to invoice” button in the detail view of a budget.

This functionality will redirect users to the edit view of an invoice record. The fields will be completed based on your budget counterparts and the line items will be copied. When you are ready to create the Invoice, click on the ‘Save‘ button. The conversion of a budget to an invoice will set the status of the budget invoice to ‘Invoice‘.
Create contract
In addition to converting to an invoice, AOS allows users to create a contract based on a budget. This can be done by clicking on the ‘Create Contract‘ button in the Detailed Budget View.

This will direct you to the view Edit a contract record, going through the appropriate fields of the offer. This includes any line item in the quote.
Invoices module
Creating an invoice
Creating an Invoice record is very similar to creating a Budget record. You can create an Invoice by going to the Invoices module and clicking on ‘Create Invoice‘ from the action bar. The first panel allows you to specify details about the invoice, such as status and expiration date.
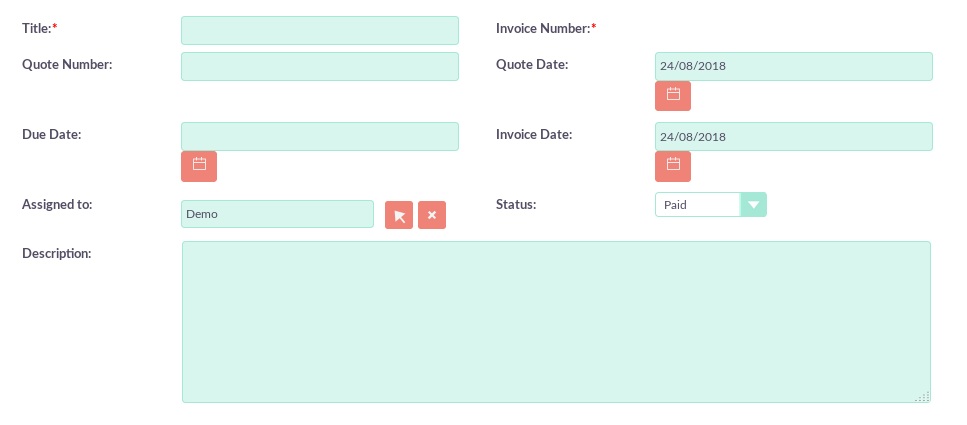
The second panel allows you to specify who the Invoice is for by relating an Account and Contact to the Invoice. When you select the account, the billing address and shipping address are dynamically extracted from the account and completed in the fields of the invoice record.
Invoice sending
To generate an Invoice, you can select one of the following three buttons in the Details View of the invoice.

AOS provides users with three methods to send Invoices:
– Print as PDF: allows users to select a template and download or save a PDF of the invoice.
– Email PDF: allows users to select a template and then directs it to the “Compose” screen of the SuiteCRM e-mail client. The PDF of the invoice will be attached to the email and the email will be directed to the contact of the corresponding invoice. This allows the user to complete the body of the email.
– Email Invoice: this directs you to the “Compose” screen of the SuiteCRM email client. The email will be directed to the related Contact of the Invoice. There will be no attachments and the invoice will be displayed inside the body of the email.
Contract module
Creating a contract
AOS allows users to create Contracts using the Contracts module.
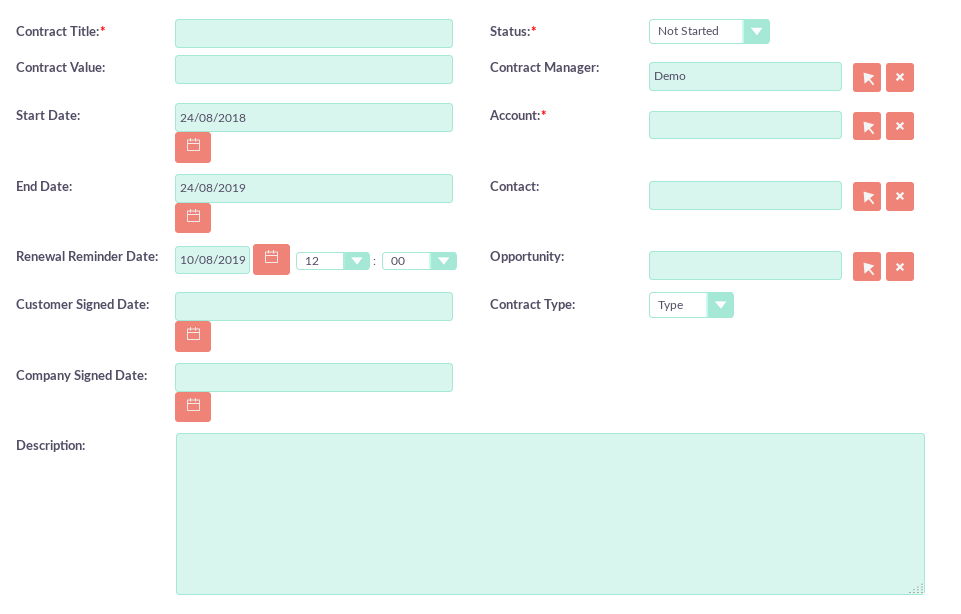
When the Contract is created, the Renewal Reminder Date will be automatically completed based on the number of days specified in the AOS Configuration in the Administrator. A call will be scheduled and assigned to the Contract Administrator for this date.